Showing posts with label CAD. Show all posts

08 August 2020

Razer Left Me Wanting

As I've likely prattled on about before, I use a mouse left-handed. I am not actually left-handed, at least when it comes to handwriting and most of my artistic ventures. The art I make on my computer benefits from a mouse over a pen tablet since the number pad does most of the work whenever the slower, precise movements of a mouse are not adequate. Most legit lefties I know have cruelly forced themselves to simply use their mouse right-handedly, especially when they're at work, and especially at work if someone got it in their head that everyone should have a so-called ergonomic mouse. Fortunately, most of the mice at my work are as ambidextrous as they are basic. 

As much as I don't mind keyboard shortcuts, having some of those shortcuts on the same hand as my mouse is extremely convenient. Perhaps it's from years of console gaming wherein all your important moves are managed by your thumbs rather than your fingertips. Before the Apple Pencil, my favorite stylus for my iPad was from Adonit, and it had two little shortcut keys near the tip. I mapped my un/redo keys to these two buttons and I got so used to it that when I used a real pencil and needed to erase, I instinctively squeezed the end I was holding. As for the mice I've had, there have been many, and I'll spare you the long, drawn-out narrative and get to the point by showing you the mouse I'm currently using at home:

No words. Should have sent a poet.

I like the Maus. I love the styling, it's got a good heft and weight to it, and the wireless has never been a hindrance to me. My only real gripe about it is it's a little small. This is hardly a dealbreaker as you shouldn't necessarily be resting your palm on your mouse anyway. Your forearm should be parallel to your desk and you shouldn't drag your arm on the surface, just as you shouldn't necessarily be resting your wrists in front of the keyboard. When the workaround is getting rid of a bad habit, I can let some things go. Given that, there is another gripe that's a little harder to ignore. It's that little silver button below the scroll wheel. It controls the DPI. 

If you don't know, DPI stands for Dots Per Inch and it refers to the sensitivity of the mouse, how fast you can move your cursor across the screen. The higher the DPI the faster and farther the arrow flies across the screen with less movement of the mouse itself. Most of you probably never bother with this, especially if the computer isn't technically yours (even if it is yours in the sense that you use it regularly and are expected to be productive with it). Some of you probably know you can adjust this sensitivity setting in the control panel, especially if some jerk who used your computer before for some reason needed the sensitivity way down so you'd have to practically sweep everything off your desk just to move your cursor halfway across the screen (or picking it up and putting it back down over and over, feeling a little more ridiculous each time you repeat the motion). 

By the way, that so-called "natural" option for scroll direction can kiss my ass.

Some mouse makers have decided burying this slider in a menu not many people bother with until something goes wrong and solved the "problem" by allowing you to adjust the sensitivity of your mouse on the device itself. It makes sense, but I've always wondered why the button to do so is typically below the scroll wheel and tilted towards the wheel (as it's following the slope of the mouse's shape) to make accidentally clicking on it virtually inevitable. The Maus compounds this problem by giving you the option of about a half-dozen different DPI settings, at least four of which seem to be for people who move their mice by gently breathing on them. Maybe on a 4K monitor it evens itself out, more pixels on screen means a higher DPI is needed to cover the same distance. 

There is a genius alternative to this that I hope more mouse makers catch on to. It's called a clutch. The idea is that your mouse is set to a higher DPI to let you navigate the screen faster. When you need to slow down to make more precise and controlled movements, you push a small button on the mouse to bring the DPI down to its lowest possible setting. When you need to go fast again, simply release the clutch. 

It's currently on the Razer Basilisk and the Logitech G502, both of which are ergonomic mice with no left-handed option. In fact, Razer used to be rather friendly to the lefty crowd, with left-handed versions of some of their most well-regarded mice, including the Death Adder and especially the Naga. The Naga has a full 12-button keypad for the thumb, which may sound crowded, but is fairly navigable. I had one of these mice for a long time and it served me well. I speak of it in the past tense because the middle click gave out. Despite their internal switches being rated to some insane number of presses, the one under my scroll wheel missed that QA inspection. 

Fortunately, Razer has a pretty generous support and warranty policy. Unfortunately, that doesn't guarantee they'll be able to replace or repair everything in their product range. As the left-handed Naga was no longer made, they offered me a short list of mice to replace it with, which were all right-handed ergonomic mice, including the Death Adder, whose lefty counterpart had also been axed recently. 

How's about HELL NO!?
Further mucking things up was the oversight of these many alternatives being out of stock. The silver lining to all of this was that I could opt to take a store credit and wait for a mouse they had coming out called the Viper. I could conceivably have gone for a cheaper mouse that was ambidextrous, but that would have left me with almost half of the store credit left over and nothing to use it on besides maybe a really nice mat. The choice before me then was either to take a gamble on this new mouse, or remap the middle click of the Naga to one of its many programmable buttons and therefore throw off my entire workflow (as I would have proper middle click on every other mouse I'd use). I chose the former option. 
Have I ever mentioned how much I love braided cables?
The Viper has been good, but it is so very just shy of perfect it almost brings the whole thing down. For what it costs and what it offers as a mouse, it's overpriced compared to other offerings in the catalog. Given it cost the same as my Naga did when it was new, it really felt like a downgrade. However, as I didn't have much of a choice what with being given store credit and all, I figured its size would be its saving grace, being near enough to the Naga that I wouldn't have to reorient myself with its feel. It gets a lot of other things right; it's got the braided cable, the DPI switch is out of the way (on the bottom of the mouse, in a small recess that you need a pen to push), and it is truly and legitimately ambidextrous. 

While it doesn't have the full 12 keys of a Naga, it's got two shortcut buttons on either side of it. Assigning my two most common shortcuts to them has, for all intents and purposes, made up for it not being a Naga. What it doesn't make up for is Razer's slow crawl towards a right-handed catalog. There's also the weight, which is my biggest complaint about it. For its price, the Viper feels cheap, almost fragile. I'm almost convinced the cord weighs more as sometimes the cord slipping off the back of my desk will pull the mouse down with it. It hasn't sent it tumbling into the narrow chasm between the desk and the wall, and I doubt it would, but I don't get why this mouse needs to be this lightweight. 

Computer mice occupy an amusing space of product design. Once upon a time, the computer mouse had to be the size and shape it was to accommodate a rubber-coated metal ball. Too big and the mouse would be hard to move. Too small and the ball would just as soon slide on a surface as roll. More importantly, the mouse had to house the mechanism needed to make sense of the ball's movements, little roller pins and optical sensors reading off tiny slotted flywheels. Later on, the optical sensor took center stage and could read off the surface directly. This meant the pins and flywheels had to be replaced with a few more chips and other components because it had to do more processing power to make sense of what it was seeing. As time went on, those components became smaller and smaller, with less hardware needed overall for the sensor to make sense of where it was on your desk. This made for a fair bit of empty space inside the mouse. 

One of the most audacious uses of that empty space was an arrangement of slots for metal weights. Weighing down a mouse seems like a weird thing to do, but just like the DPI adjustments, sometimes you need to be able to move your mouse in a fairly controlled and precise manner. A high DPI combined with a weighty mouse gives the best of both worlds. 
So you now understand the weight of the situation.
The Viper definitely has the empty space for such weights, but the only way I'm going to get that is the DIY route, and I'm not about to start drilling holes and prying stickers and panels off of an 80USD mouse (that's also what the G502 costs, weights included). 

Luckily, I've found a few alternatives outside of the Razer catalog such as Steelseries and Corsair. They don't have weight options, but they are notably heftier than the Viper along with sharing a similar form factor. That includes those shortcut buttons on either side of the casing. To be fair to Razer, since its release, the Viper's price has come down a little. It's still not low enough for me to begin exploratory surgery, but I don't hold the price point against them anymore. Last week, I was looking through their site to get some specs for a LinkedIN post I'm writing covering this topic in a little more work-related depth. I saw they offered two new versions of the Viper, one wireless, and one labeled "mini." I thought all my problems were solved. Wireless mice make use of that empty space by storing a battery. The battery adds weight, and I've got hefty where wimpy once was. However, Razer, in their wisdom, found a way to make the wireless Viper weigh virtually the same as the wired version. That's okay, I thought, I've got an option. Yes, the mini is smaller, but it's also about half the price, well within the territory of being modified with no real blow to the bottom line. 

Then I got a better look at it. 
Can't see the problem? That's okay. I didn't spot it right away, either. 
... 

... Razer? I want you to look at me. I want to ask you a question and I want you to think long and hard about your answer before you tell it to me. I want you to think about all that I've said about the past designs of your products which I have praised you for. Okay, here we go:

How can it be an ambidextrous mouse when the shortcut keys ARE ONLY ON ONE SIDE!?
It's the LITTLE things....
Look, I get that making left-handed versions of your ergonomic mice isn't ideal for you. There simply are not enough left-handed mouse users to justify production on that scale. 

By the way, LoFree isn't off the hook either.
Define symmetry for me, please.
In their defense, the place on the right-hand side where some shortcut keys would be nice is taken up by an adorable little storage compartment for the wireless dongle as well as the charging port. As I said, I do like the Maus, but I prefer it as a portable accessory for my iPad when I need to use a mouse with it. The same goes for the keyboard I've got at home right now. It's fine enough for the Mac mini, but it's better suited to accompany a tablet. 

A wise one once said that art is never finished, only abandoned. I suppose I've got the same philosophy with my workspace, a constant work in progress. That reminds me, I have to get back to designing my new desk. 

09 April 2018

Spoiled On Legos

For all the ranting and raving and raging I've done about Sketchup, some may wonder why I keep going back and trying again at it. Is it pure stubbornness? Maybe. Is it because more often than not it actually does work and produce usable results? Yes. In fact, at least two of my most popular and liked models on Thingiverse were made in Sketchup. There's a fine line between valid criticism and outright negativity, and I realize I tend to feed into that negativity feedback loop when I complain about how almost every other step in every other Sketchup tutorial is a workaround for something the program can't do, how what's streamlined in one application is almost abstract in this one. For that skewed view which I'll elaborate on in a moment, I owe Trimble my sincerest apologies, for whatever they're worth. 
Speaking of fine lines, my overall issue with Sketchup is that it walks a very fine line between having a learning curve and being badly-designed. As for that latter point, I'm here to give Trimble a great big pass wrapped up in my apology like a pig in a blanket because even if we all agree their software is badly-designed in some key areas, it's not entirely their fault. Without getting into a long, drawn-out history of how Sketchup came to be as it is, the fact of the matter is Sketchup is not a 3D modeling tool. At least, it's not a 3D modeling tool out of the box. 
Sketchup was made to be a visualization tool for architects, landscapers, and interior designers. All of these jobs have one common thread that Sketchup uses as its foundation, and that's... a foundation. Before you can make any sort of structure or even arrange existing elements within a structure, you need to know how much real estate/floor space you've got to work with. Barring any low ceilings or overhead lighting or air traffic considerations, this is fundamentally a two-dimensional exercise. 
That's "Josh" by the way. He's the default height reference for every new document. 
Think about it. If you didn't have the benefit of modern CAD technology, you'd be using a straight-edge, a pencil, and a piece of paper, not to mention a tape measure and maybe some masking tape to mark out spaces on the floor. 
You certainly wouldn't be stacking cardboard boxes in the middle of the room unless you've got some enormous on-hand supply of moving boxes of various sizes depending upon your needs. My point is that Tinkercad, one of the programs I use for my 3D printing work, is absolutely horrible in this capacity.
Not pictured: Josh.
Ignoring the fact that Tinkercad was never meant to be an architectural tool (and therefore all your default dimensions are in millimeters), there's also the matter of exporting the model into a usable format. Tinkercad exports to the STL and OBJ formats, which are 3D. There is a 2D format it can export to, but it's a simple vector image (SVG) meant for laser-cutting, and not very useful if you're trying to show a client how a location is going to be arranged. Sketchup, meanwhile, allows me to export my current view of the scene as a PNG file (that's in the free browser-based version) as well as having an entire host of 2D tools for sharing one's work as architectural blueprints (that's in the full-size version). 
Sharing one's work aside, this comparison is meant to demonstrate the fundamental difference between the mindset of someone who would need Sketchup and someone who would need Tinkercad. The best analogy is that Sketchup is like cutting posterboard and foamcore to build your structures while Tinkercad is like playing with Legos
Not pictured: Emmet.
This is not meant to put down either program. Both are perfectly valid solutions to their respective problems, just as foamcore is a perfectly valid material for making architectural models and dioramas while Legos are a perfectly valid material for making mockups of physical objects or scenes (even practical protoypes if we want to get Technic...al). 
We can work on the decor.
Going back to what I was saying before, Sketchup was originally a visualization tool for people more concerned with open floorspace than tight tolerances. After Google picked up the project to make it some sort of plug-in for Google Earth, it seems the need for 3D functionality increased and suddenly all these new features need to be shoehorned into a program not intended for them. Even on their own forums, many users often joke about making circles and spheres in Sketchup. I built up a small archive of screenshots demonstrating the results of early attempts at mastering the delicate and subtle art of making spheres, but I won't put them here. It wouldn't be fair. Rather, I would encourage you, even if you've only a passing interest in the subject, to give the free, browser-based version of Sketchup a try, maybe sit through a few tutorials first to get an idea of what you're in for, and see if it's something you want to invest in. I even used its visualization/layout aspect for a recent DIY project of a computer monitor stand that used a combination of scrap wood and metal, as well as some 3D printed parts (which were modeled in Tinkercad). 

07 March 2018

If You Love TinkerCAD So Much....

UPDATE 13-MARCH-2018: After much e-mail correspondence with the CEO and founder of SelfCAD, along with concerted efforts between him and his staff, some issues described below have been resolved. Still, more remain as of the time of this update. My final assessment as of now is that this program is not in a state of viability that makes it worth my time and effort to invest in. I've formally requested a refund of my annual license which I am assured will go through in a few business days. 
I have no intention of retracting or editing this entry beyond this update, as at best I could simply replace it with an at least equally-lengthy exploration of the new issues I was able to demonstrate for the SelfCAD team earlier today. Rather, I'm going to leave that new information between us for them to use as they see fit moving forward. Although I'm no longer using SelfCAD, I want to make something clear to anyone whose interest in the program led them here. 

Go ahead and try it. 

No, I'm serious. For all I've said and all the more I would have to say, I don't begrudge SelfCAD or anyone involved in the project for the state of the app. I have the fullest confidence they will sort out the issues and get to a state that will hold its own against the likes of Fusion360 and Sketchup, and certainly run circles around TinkerCAD and OpenSCAD
There's also the notable possibility that you could use the app and never have any of the problems I had with it. A fellow engineer mentioned giving it a try and falling in love with the sculpting features (which I barely bothered with at all), and was shocked at the screenshots I posted. He never encountered these errors, but he used the app differently than I did. To put it another way, your mileage may vary. You've got 30 days, use them.

I'm honestly still looking forward to an iPad version. I'll be there day one to try it out. 

END OF UPDATE.

TinkerCAD is a very simple 3D modeling program meant for 3D printing. Many scoff at its simplicity, calling it a kid's toy. What's ironic is that many of the scoffing remarks seem to come from people who use OpenSCAD. OpenSCAD is a needlessly complicated and obtuse graphics modeler the use of which is best described as attempting to teach a graphing calculator to play chess. To be fair, at least their dismissal has nothing to do with the price tag. That distinction gets left to the other scoffers who swear by the likes of Autodesk Inventor
As far as 3D printing goes, Inventor is overpowered. More than half of its features are completely useless, and I don't like paying full price for something I can only use half of, I don't care if it's somehow nice to have the option for more. There's no denying its usefulness and versatility, I simply have no need for it. That said, I'm always looking for an alternative to TinkerCAD, since there are times when I find myself using far too many workarounds for its limitations. Tragically, there used to be a middle ground to this paradigm in the form of 123D (also from Autodesk), which has since been discontinued. To fill this gap, Autodesk overhauled Tinkercad to have a few more features than previous versions, and the rest of their focus has gone to a CAD program called Fusion360. I've used Fusion360 and while I don't hate it, any time I tried importing a model to modify or edit, it never, ever got the scale right. No matter what I set the original model to, meters became feet, feet became inches, and millimeters became yards. It seems as if I have to start completely from scratch within its borders and never venture outside its ecosystem. I looked into the issue to see if I was doing something wrong. It turned out this was a known issue and Autodesk had not yet fixed it. The forum post that outlined this was dated 2015, and I was first trying this program in 2017. 2 full years and no progress on a simple matter of making the program understand scale, the most basic principle in technical drawing and engineering. It'd be laughable were it not so infuriating. 
I've talked before about how tech support is often so reluctant to admit when their program can't do something, reasons being 1) It's their product/paycheck, of course they're not going to talk trash about it, however valid the criticism, and 2) there's always the possibility of a feature being added or a known issue finally being resolved. Here's why this outlook needs to be shut down. To address the first point, if your program cannot work as it has advertised itself and/or is simply not suitable for a given application, it's less suspicious to spell out what exactly your product can and cannot do so you can focus on what works and get it in the hands of the right people who can make the most of it. Secondly, if I'm paying for an annual license, every day I'm made to wait on getting an issue resolved is time I can't actually use the program. I can't wait on a possibility. I'm going to find something else, and I'm either not going to renew my license, or I'm going to fight to get it refunded, and with the issue I'm having now with SelfCAD, I have a strong leg to stand on. 
SelfCAD is a browser-based 3D modeling program just like TinkerCAD, but with an interface somewhat closer to Fusion360. It doesn't have the scaling issue of the latter, but it is going to take you some time to work out exactly what scale the program is working in. To be fair, the only reason this is a problem is that not only is SelfCAD create 3D models, but it can also prepare them for 3D printing by having its own slicer. Scales can ultimately be adjusted when moving from program to program, of if the model is only going to be viewed on a screen, but when printing a physical object, it's important to get the scale right. While I have had some issues with the slicer, they don't compare to the issues I've had with making a simple model, not being able to make it, and then being given two pieces of advice from their technical support team that simply do not pan out as insisted. 

All I'm doing is taking a simple shape, like a cube or a hexagonal prism, 
twisting it, 
and then putting a cylindrical hole in the middle of it. 
Setting aside the practical use of this model, this shouldn't be a great challenge for a program meant for producing three-dimensional solid objects for 3D printing or other means of fabrication. However, when the time comes to subtract the cylinder from the twisted block:
It's a little hard to tell what's going on from this angle, but removing the cylinder has hollowed out the entire interior of the twisted block. 
This should not be a difficult task to perform. I inform SelfCAD of this issue through their site and get an acknowledgment in my email inbox:
"we have received your message and are currently investigating the issue."
Along with this, the following video from their YouTube channel is included: 

Seems simple enough, except I followed this tutorial exactly and got a different result. At least, it seems I got a different result; we don't see whether or not the bat symbol got the same sort of hollowing out or if it had a proper rectangular hole. I bring this up in my reply to that first e-mail. Roughly 5 whole days pass before I get the next reply:
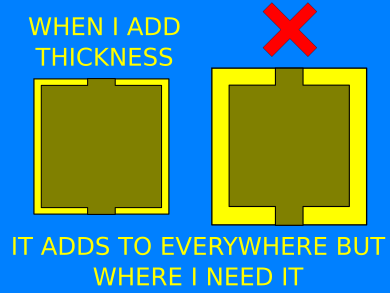
"If you apply the Add Thickness tool with thickness set to 1 to cube after the hole was made, you should get your desired result."
No. No, I do not get the desired result. I literally get a worse result. Not only is the shape still hollowed out where it shouldn't be, but thickening the walls have thrown off all the external dimensions. 
Adding thickness does not fill in the volume around the space left by the subtracted cylinder. Instead, it adds thickness to the entirety of the hollowed shell, expanding its overall size. 
I mean, this is almost insulting. Who would call this a viable solution to the problem of making a cylindrical hole in a given shape. I honestly wonder if they tried this themselves before passing the info off to me. Also, on the off-chance I'd gotten the wrong information, I tried applying the thickness to the shape before subtracting the cylinder.
I don't even know how to approach that situation, especially when the "undo" shortcut simply stops working for no good reason. I shared these updates with SelfCAD, and I have yet to receive a response. Given the 5-day turnaround on the last interaction, I'm not optimistic about receiving this update in a timely manner. The only reason I'm even concerned about the turnaround time is that I've purchased an annual license to use this software. If it can't handle what should be the simplest task possible, and everyday I can't use it effectively goes against that annual license, I'm wasting money on something that doesn't work, and can't even get a straight answer on whether or not that's supposed to work to begin with. 

To give an idea of how simple this process should be, here's the same exact process done in TinkerCAD:
SelfCAD, I am legitimately regretting my contribution to your cause. Not only does this not make me want to buy another annual license, but I'm going to lobby for compensation on what I've already paid. This is absurd. OpenSCAD doesn't even have this problem. 

I kid you not, the day I wrote this, I got an email from SelfCAD inviting me to their ambassador program. How can I represent something that it seems no one at the company knows how to operate? 

07 February 2018

A Sketchy Arc

Damn it, Sketchup, why do I have to fight with you so much? I keep trying to give you the benefit of the doubt that you've simply got a learning curve and how you work as a 3D modeling program isn't like those other 3D modeling programs. I write these long, angry diatribes about how making a sphere is like summoning a demon while on the moon and with a bucket over my head, yet I wait. 
Now, today, after revisiting the browser-based version, I swear you're pulling the wool over my eyes. 


I was literally trying to recreate what I saw in this video in another tab and at around the 4:10 mark, I see a sleight of hand. This is the comment I left verbatim and a screenshot of exactly what I was seeing when I tried to follow along.

Okay, I hate to be "this guy" but I feel like we're either missing a step or calling a tool by the wrong name. I'm literally following this to the letter in another tab right now and my arc tool isn't working like this... at all. I didn't even see you click on the arc tool, it was just selected after you made the line.
I make the vertical line, put the circle on top, draw another line from the center of the base to the edge... and then the arc tool acts nothing like what I'm seeing on screen. I click on the arc tool and I get a compass overlay that keeps trying to draw an arc that's convex to the vertical line. After some fiddling to try and at least get the arc to be concave, it doesn't go from the edge of the base to the circle up top. It's only as tall as it is wide and trying to tweak it gets me an error message about too many segments.
I have no clue what I'm doing wrong and I feel like this happens every time I try to do anything in Sketchup.

It may be a little hard to see, but that little green circle near the edge of the base is what I somehow have to place somewhere to make an arc between the edge of the base and the circle atop the line. It's also worth repeating that we saw this tutorial first select the arc tool, then change their minds and select the line tool, draw a line from the center of the base to the edge, and next thing we know we're drawing an arc between those two points. 


Let's be clear: you have to select the tools on the left hand side of the screen. His mouse cursor never ventures close to that and suddenly we go from a line tool to an arc tool. I can't find any keyboard shortcuts that would allow this, and even if I did, the arc tool doesn't work as it's being shown. 

This is why I hate learning any kind of software. There's always something in the tutorial (which I've sometimes PAID for the "opportunity" to sit through) that is not accurate, it's fairly important, and whoever I learn it from gets so embarrassingly tripped up it's like watching someone try to recite the alphabet backwards and start over every time they mess up. Normally, when I've written these, I leave them in the drafts folder until I calm down a little, I read a few more tutorials, wind up feeling stupid because I missed something obvious, and then the post never goes live due to its newfound inaccuracy. Given I've also left a comment on the video, I should probably wait until I get an answer to that before I go pressing the publish button. However, I've wound back this video at least five times and whatever the instructor is doing, it's not working when I try to do exactly as he says. 

Please, whatever I'm doing wrong, tell me. 
I'm not trying to shame anyone. I just want the damn thing to work as advertised. 

UPDATE: Okay, so about an hour after posting this, when I was still too frustrated to sit back down and give it another go, I reasoned that maybe it was the 2-point arc tool being used. This morning it turns out I'm right. So, that half of the mystery is solved, but it doesn't explain how he selected the arc tool, to say nothing of simply not specifying which of the 4 distinct arc tools he was referring to. I mean, that's kind of important. How many shapes are there?

Also, the top of the pawn is hollow now, and that's an improvement over the first time I tried using the "Follow Me" tool in order to make the upper portion.

UPDATE II: It's the mid-afternoon, and Sketchup responded to my YouTube comment, but only about halfway. 
Het Matt! InSketchUp Free, the nested tools show the last tool you clicked on. In this video, Aaron is showing the default tools (the ones that are available by default when you first start Sketchup Free). In the case of the Arc tool, 3 point Arc is the default, but if you clicked on 2-point Arc previously, that will be the tool that activates when you click on the Arc icon. Your best bet is to start a totally new session of Sketchup Free and try again.
Like I said before about the 2-point arc, he selected that particular arc tool, which means that if he ever goes back to it, that's the one that's selected. Fine, except that's not my problem. Not specifying which arc tool is annoying enough, but he seems to select it without using his cursor at all. There's a keyboard shortcut for the Arc tools, which is "A" conveniently enough. What's not convenient is that he doesn't mention this in the video and I don't even think it's mentioned in another video dedicated to explaining all the different arc tools. Exactly how "Step 1" is this chess piece tutorial? Admittedly, that's on me. I'm hardly a stranger to Sketchup, and I haven't touched the software in a while, so forgetting a shortcut or two isn't Trimble's fault. Known issues, though.... 

A quick check on the forums also revealed that if your model is too small, Sketchup will not draw certain faces. In my case, because my pawn is small, it puts a hole in the top. Here's where this software starts to fail at justifying its 800USD full version. If I take my model, before I use the "follow me" command to make a sphere and a pillar, and scale it up, it not only makes the sphere whole, but if I then scale it back down to where it couldn't draw the full sphere, there's still no hole. 
I'm not changing the number of polygons when I scale it, so why does the overall size matter? 

19 November 2016

And Viewers Like You


Okay, I don't want to give this guy much grief, hence cutting off his name. I see this often enough he could represent a number of people we may know in our lives. It's a sign of a far bigger problem in our culture.

Setting aside the bullshit that is charging people 10USD to view files made on a CAD program that can costs hundreds (Want to see the mock-up of your commission? 10 bucks, please!), we have to bear in mind that there's no trial version of this app, and the word VIEWER is in the name, to say nothing of the full description.

That means this guy paid a full ten US dollars to use an app, only to give it a one-star review because it won't do what it never claimed to do in the first place.